CAMPING
How to Build a Campfire
Everything you Need to Know
About Starting a Campfire
BY: NANCY BOUCHARD
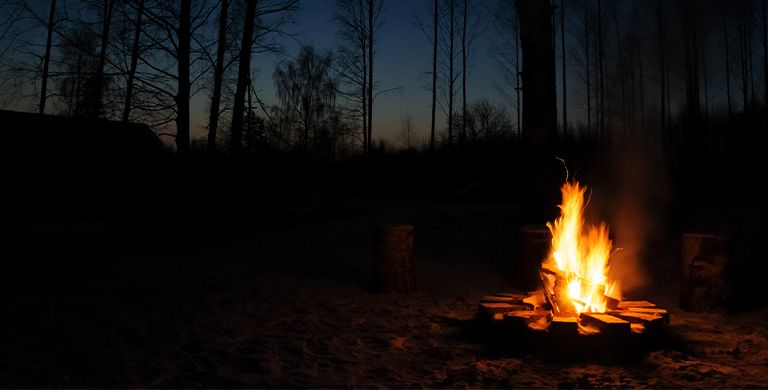
Campfires are one of the simplest pleasures in life. Building a campfire is an age-old skill that’s been handed down from generation to generation. Food seems to taste better over a campfire. And flaming logs and red-hot coals can turn a bone-chilling evening into a festive event. In addition to adding warmth, campfires are handy for additional light for setting up camp and cooking. They also provide a mesmerizing focal point that inevitably increases comradery, encourages storytelling, singing and guitar playing, and provides that intangible sense of place that forever remains etched in our collective memories.
Shuayb Twaissi, a hiking and cultural guide in the historic UNESCO site of Petra, Jordan says, “As a Bedouin, fire is very important for us, not only for cooking but also as a survival essential. My father inherited the following advice from his father, which I’ve passed along to my son and daughters. ‘If you find yourself hungry, start a fire. If you are cold, start a fire. If you are scared, start a fire. If you feel lonely, start a fire.’ And regarding safety, he would always say ‘Never sleep while your fire is not.’ And to cook, or to make tea outdoors, all you need is wood, something to spark the fire and three stones as a tripod to set your pot or pan.”
You may not have the thousands of years of fire-making experience of a Bedouin, but inevitably, in every group you’ll find a “campfire expert,” meaning someone who seems to know (and love) everything about campfires. Ideally, this person has received some training on gathering wood, starting the fire, keeping the fire burning, fully extinguishing a fire, and general campfire safety practices. But whether the skill set was handed down from older generations, taught in an outdoor class or club, or just developed through trial and error, there are some essential elements that everyone can easily learn. There’s no reason you can’t be the next campfire expert in your group by following these easy steps.

Gathering Wood for a Campfire
In many camping areas, you can buy a bundle of firewood. Keep an eye out for a “firewood for sale” sign. It is worth paying someone with local knowledge about firewood—you can be assured it is dry, sustainably sourced, and ready to burn. Many areas, including some state and national forests, public ocean beaches, and national recreational areas allow you to gather wood, but make sure you check local regulations. Keep in mind that if you collect wood, take care not to denude the landscape directly around your campsite. Gather enough wood to start a fire and keep it burning for a half-hour to an hour. You don’t want to finally get a fire started and then have it go out while you are searching for more fuel.
If you are gathering your own wood, make sure it is dead, dry wood. Bring a small axe or lightweight saw for shaving kindling off of bigger pieces of wood and chopping dead branches into smaller sections.
If you are gathering your own wood, make sure it is dead, dry wood. Bring a small axe or lightweight saw for shaving kindling off of bigger pieces of wood and chopping dead branches into smaller sections.
To Start a Fire you’ll need a Spark
We heartily recommend always bringing along two lighters if you are depending on having a fire for food and heat. If you are not worried about weight or space, longer butane lighters are the best bet as they keep your hands safely away from the flame. Matches work, but you have to keep them dry. You can buy waterproof matches in case you end up camping in the rain, but why take a chance? We recommend long wood ones stored in a waterproof container; also make sure they are “strike anywhere” matches.
Flint, steel and magnesium fire starters work in both wet and dry conditions. They are excellent tools but you should definitely practice before solely relying on them in the backcountry. If you’re interested in honing your backcountry survival skills, there are many ways to create a spark, including using a magnifying glass or lens to focus the sun (even a lens from a pair of glasses will work), a bow and string for friction, or naturally occurring flint stone. These fire starting methods are great skills to master, and a great, more sustainable alternative to a lighter or matches.
Flint, steel and magnesium fire starters work in both wet and dry conditions. They are excellent tools but you should definitely practice before solely relying on them in the backcountry. If you’re interested in honing your backcountry survival skills, there are many ways to create a spark, including using a magnifying glass or lens to focus the sun (even a lens from a pair of glasses will work), a bow and string for friction, or naturally occurring flint stone. These fire starting methods are great skills to master, and a great, more sustainable alternative to a lighter or matches.

What You Need to Start a Fire
A good fire requires tinder, kindling, and larger pieces of dry wood. Tinder is quickly combustible material—you don’t need much. Kindling is small pieces of dry wood or twigs. And you’ll need bigger logs to keep the fire burning.
Tinder
Start out with a fist-sized pile of tinder. Dry shavings of wood are best, but you can also use wadded up paper, dry grass, cotton balls (really), a pitchy pinecone, dry pine needles or even an abandoned bird nest. The point is that the material is small, dry, and has lots of surface area that ignites easily.
Kindling
Think small when you’re building a campfire. You’ll need something to help ignite bigger pieces of wood. You’ll want a few handfuls of thin, 4-6-inch dry, dead twigs, dry pinecones, or thin sticks of sappy tree bark. If you’re nervous about getting a fire started, buy some resin-dense Fatwood sticks and bring them along.
Loosely lean the kindling around and against the tinder. You’ll need the kindling to touch the tinder in order to ignite. Make sure the kindling sticks are close enough together to ignite each other, but with enough space between them to allow sufficient air to fuel the fire.
Loosely lean the kindling around and against the tinder. You’ll need the kindling to touch the tinder in order to ignite. Make sure the kindling sticks are close enough together to ignite each other, but with enough space between them to allow sufficient air to fuel the fire.

The Geometry of the Logs
There’s no hard-and-fast rule about how to lay out the logs for a campfire, although everyone has a personal favorite. The important thing to remember is that fire requires dry wood and air to burn. Always start with smaller pieces of wood; if you know you need a fire for several hours, add a bigger section of log (try to keep your log sections under two feet so that you can completely burn them to ash before you extinguish your fire). Most people burn way more wood than they need; it is a skill to keep a fire burning with just enough wood and not too much.
Think about the size of a fire you want before you start building one. We’ve been fortunate enough to camp out with Bedouin guides in Jordan, sheep herders in Turkey, and eco-tourism experts in Colombia, and they are masters of a quick small campfire for a cup of tea or nighttime warmth. We’ve never seen them worry about what shape of fire they build, but the guiding principle is to keep a fire as small as possible as to not waste fuel, to burn hot, but still be easy to extinguish.
Most campfires start with the tinder, and then kindling. As the fire gets going, you gently add more kindling (gentle is the word as you don’t want to knock out the initial flame.” Then you want to lay bigger wood around the kindling, close enough that it can catch the flame, but not so close that it deprives the flame of oxygen.
Some of the classic fire “lays” include the following:
Tipi (tepee)
Almost all fire “arrangements” stem from the tipi shape. Essentially, you place the tinder in the middle, arrange the kindling (twigs) around it in a conical shape with the pieces leaning up against each other. That way the tinder flames are surrounded by small sticks/twigs that they can ignite. Get the tinder and kindling burning first. You may want to softly blow on the tinder to help it ignite the kindling. As the kindling starts to burn, add in more kindling, one piece at a time. You will then add a bigger stick, again in a tipi shape. This fire promotes lots of airflow and will burn quickly and bright.
You can always make a bigger tipi by leaning bigger logs against the original structure. However, as tipis burn hot (and fast), larger tipis take a lot of attention. If you want a fire that will burn more slowly, and lasts longer, start with the tipi tinder/kindling configuration, and then strategically stack bigger pieces of wood (think the size of your wrist) in a geometric shape around the tipi. This gives your fire fuel and provides a bit of a windbreak for your kindling to start burning well. You can always add kindling (with incrementally bigger sticks or twigs).
You can always make a bigger tipi by leaning bigger logs against the original structure. However, as tipis burn hot (and fast), larger tipis take a lot of attention. If you want a fire that will burn more slowly, and lasts longer, start with the tipi tinder/kindling configuration, and then strategically stack bigger pieces of wood (think the size of your wrist) in a geometric shape around the tipi. This gives your fire fuel and provides a bit of a windbreak for your kindling to start burning well. You can always add kindling (with incrementally bigger sticks or twigs).
Log Cabin
With the Log Cabin, set two larger pieces of wood parallel to each other on either side of the tipi. Then place another two pieces of wood on top of the original two, in the opposite directions, to make a square. Keep stacking wood so that you have 3-5 layers, depending on the size of wood you are using. Ideally, you use smaller and smaller pieces of wood as you go up (so that it makes a pyramid), so when each piece burns, it falls down into the fire.
Triangle, Star and Platform Fire Lays
You can also lay the larger pieces of wood into Triangular shape, with the corners overlapping to create spaces for air flow.
Sometimes, people place several logs with one end in the fire, and the other end sticking out, like a bike spoke or star. However, this type of structure generally requires a bigger fire pit. With the Spoke or Star fire lay method, you need to keep pushing each log toward the fire.
There are plenty of other methods of laying out a fire. The Platform Method involves placing pieces of firewood next to each other, and then three more on top, perpendicular to the baselayer, with multiple layers according to how big of a fire you desire. If you need a big bed of coals for a big cook pot, the platform method works, but it is difficult to get started, and you are going to have a large, roaring fire until it burns down.
The Lean-To fire method was created to build a wind break in breezy conditions. The problem with this method is that you really shouldn’t be building a fire when it is windy. Ideally, all you will need is the sides of your firepit (made of stacked rocks). If you are in a very safe area for fire building (like on a sandy beach with no grass, trees or shrubbery), you can make a windbreak by using a bigger piece of firewood as one “wall” of your tipi to act as a shelter. However, you are better off finding a place where there is no wind (think on the underside of a dune or big rock).
Options to an Open Fire
If an open fire is prohibited, which is often the case in hot, dry and windy weather, there are plenty of alternatives for camp side ambience. Check out the regulations for your destination; if you are looking for the ability to cook chances are you can still use a gas or propane-powered stove, or even briquettes. Many times, there’s a “flame” height limit for gas or liquid fuel stoves that comes along with a fire ban. If you are just looking for ambience (rather than warmth or cooking), there are some very fun LED-powered lanterns and are not on your priority list. BioLite makes a really fun lantern, the AlpinGlow, that has a "Candle Flicker" mode that produces a soft light that mimics a candle flicker. Plus, the lantern has multiple brightness options so you can use it for cooking, in your tent, and even for after-dark hacky sack. We also love the TerraFlame smokeless table-top candle that uses very safe bio-fuel gels that are even approved for both indoor and outdoor use. The TerraFlame Geo Tabletop Fire Bowl can even be used to flame-roast your marshmallows for S’mores as its clean burning, food safe, and smoke free.

If camping is in your plans, check out Columbia’s awesome selection of outdoor clothing that are designed to go from city to campsite and back again.