SKI & SNOW
Everything You Need to
Know About Hiking in the Snow
Get ready for adventures in the snow with our guide to winter hiking for beginners
BY DAVID YOUNG
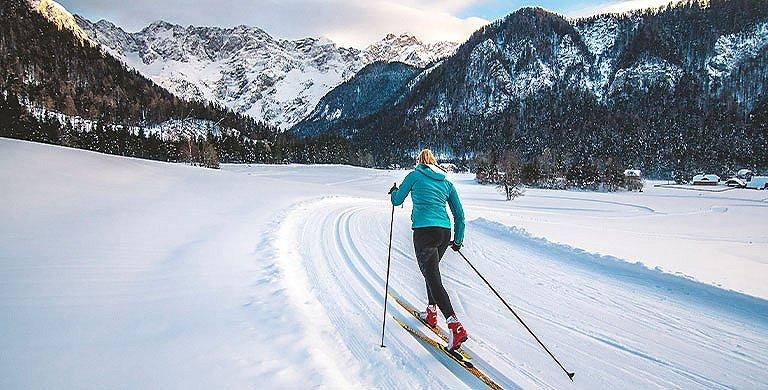
As fall leaves start to flutter to the ground and snow transforms hiking trails into winter wonderlands, it’s tempting to hang up your hiking boots until next spring. But with the right preparation and gear, you can enjoy your favorite trails all winter long.
Winter hiking creates a whole new adventure. The same vistas and landscapes you enjoy the rest of the year take on a new life in the winter months. And as the crowds disappear, you often get these winter wonderlands practically to yourself.
Hiking in the snow is different from summertime hiking, and if you’re new to snow and ice, it can seem daunting. But we’ve got answers to your questions and will help you prepare for a warm winter adventure.
What do I need to know about hiking in the snow?
Before you go
The success of every winter hike starts at home with proper preparation and planning. First, make sure to check that the trail is open. There are more road and trail closures in the winter due to extreme weather. It can also be helpful to call or drop by your local ranger station.
Next, check a reputable local forecast. You don’t want to head into the snowy mountains if the region is expecting major storms or high winds. And finally, remember that all of the above is subject to rapid change, especially in the wintertime.
Next, check a reputable local forecast. You don’t want to head into the snowy mountains if the region is expecting major storms or high winds. And finally, remember that all of the above is subject to rapid change, especially in the wintertime.
What to bring winter hiking
If you plan to be hiking in the snow, in addition to warm clothes, shoes, and a good backpack, it’s essential to have emergency supplies on your gear checklist. At bare minimum, always bring an emergency blanket, first-aid kit, whistle, waterproof fire starters, and hand and toe warmers.
And don’t forget extra batteries for any device you pack with you. Batteries drain quickly in the cold, so try to keep them and all of your devices as warm as possible in an inside pocket.
And don’t forget extra batteries for any device you pack with you. Batteries drain quickly in the cold, so try to keep them and all of your devices as warm as possible in an inside pocket.
What to wear hiking in the snow
It’s imperative to have warm, high-quality clothes specifically designed for cold weather when you’re hiking in the snow. Your gear should be insulated, waterproof or water-resistant, and performance oriented, which means no cotton or denim.
Hiking layers are key, especially in winter. Each layer you put on, from your baselayer to your shell jacket, creates air space where heat lives and helps keep you warm in the cold. You’ll start out warm, be able to shed layers as you heat up during your hike, and then layer back up to get cozy again.
A classic three-layer system for hiking in the snow includes a baselayer, a thermal midlayer for insulation (typically a fleece, knit, or puffer), and a waterproof outer layer to block the weather.
If the hiking trails aren’t too rigorous, you can potentially opt for a ski jacket, although this may be too warm for high-intensity winter hiking. A final option is to choose an interchange jacket which includes all three layers in one.
For your bottom half, opt for warm water-repellent hiking pants or outer shells with thermal baselayer tights underneath. If you’re in deep snow or a backcountry environment, you may want to choose snow pants. You’ll also want a warm hat and gloves.
Lastly, don’t forget your footwear. Keeping your feet warm is absolutely vital to enjoying your winter hike and preventing frostbite. In addition to making sure your boots are made for the snow, moisture-wicking hiking socks will help keep your feet dry and cozy.
Consider the terrain you’ll be hiking through and familiarize yourself with snowfall levels to determine how to choose the best winter boot for your snow adventures.
Hydration
Even though you’ll be hiking in the cold and may not be sweating as much as you would on a summer hike, it is extremely important to remain hydrated. Aim for drinking at least 7 to 10 ounces of water every 10 to 20 minutes during your hike. Keep in mind that dehydration can speed up hypothermia, so consider carrying electrolyte hydration powder packs to help stay well hydrated.
The typical water bottle for winter hiking differs from what you might carry in the summer, when the goal is to keep your water cold. For your winter hike, you’ll want to keep it warmer so it doesn’t freeze. Instead of stainless steel which can get extremely cold when exposed, consider a BPA-free plastic bottle with a wide-mouth top made from Tritan™ material. This plastic is less likely to crack than some other types, even if you add boiling water to use it to keep warm—just make sure the lid is sealed tightly. Store your water bottle inside your pack or in an insulated neoprene bottle holder to prevent it from freezing.
Hydration packs can also work for winter hiking but the hoses have a tendency to freeze in cold weather. If you take that route, carry the bladder close to your back for body heat, and consider getting an insulator. Blow the water back into the bladder after each drink from the hose to clear the tube so it’s less likely to freeze.
The upside of water reservoirs and hydration packs is that the bladders won’t crack in the cold and you can fill them with warm water or tuck them into your clothing for extra warmth.
Remember, you’re burning more calories, so in addition to staying hydrated, it’s important to refuel with a snack or two during your hike. It’s recommended to bring more than you think you’ll need, and focus on foods that pack a lot of carbs and calories into small spaces. Avoid stopping to eat a full meal to keep from losing body heat and momentum.
Orientation
Even familiar trails will look different in the winter. There may not even be a clear path to follow if the snow is fresh and high.
To help avoid getting lost, pay attention to trail markings and landmarks. Learn how to use a compass and take it with you—don’t rely on GPS from your phone. Take a paper map printed at home, or get one from a ranger station.
Remember that conditions can change rapidly, and snow can move around and pile up. Hiking in a whiteout can obscure signs or trail markers, sometimes even hiding the whole trail. So it’s vital to always know where you are and not rely on just following a trail.
Some trails have markers painted on tree trunks, which remain visible year-round. Use these markings during your winter hike and try to stick to the trails as much as possible. Keep to hardpack snow rather than wandering into deep snow—save that for snowshoeing trips.
Days are much shorter in the winter, so plan ahead for sunset and leave yourself plenty of time to get back to your starting point before dark. Start your hike early in the day, and include a headlamp in your emergency supplies just in case.
Also, remember that you move slower in the snow, so it can take longer to navigate even a familiar trail in the winter versus the summer months. Be sure to build in time to allow for a slower pace.
Is it safe to hike in the snow?
As with any hike, there are risks and challenges with winter hiking. But by taking the right precautions and planning ahead, you can mitigate a lot of the risk.
First of all, if you’re new to winter hiking it’s important to start slow. Don’t plan your first-ever hike in the snow to be a three-day backpacking trip into a rugged, remote wilderness. Instead, start with an easy day hike near home or pick a trail you’ve hiked in other seasons, and build up. If you decide to eventually do an overnight trip, get the right winter backpacking gear and familiarize yourself with tips on winter camping too.
There are also some considerations you don’t have to think about in summer such as ice, frozen lakes, tree wells,and avalanches. Slipping on ice can abruptly end a fun hike. Keep a sharp eye out for the gleam of ice on trails, especially in the early morning when it’s really cold. Cross ice on the trail by keeping two points of contact at all times. Keep your center of gravity low and shuffle like a penguin. Hiking boots with excellent traction are really important in winter conditions, so look for options with technologies like Omni-Grip™ or Adapt Trax™. Don’t skimp here—you don’t want to slip and fall miles away from a trailhead.
If you plan on hiking in terrain where avalanches are prevalent, it’s a good idea to take an avalanche safety course before you hit the trail. A general rule of thumb is to not go hiking immediately after a big storm. Frozen lakes and rivers can still have water flowing underneath, creating the risk of falling through, so avoid crossing frozen bodies of water in the winter.
To make winter hiking as safe as possible, follow these tips and be sure to tell people where you’re going ahead of time. Consider carrying a GPS location device. And in harsh winter weather, solo hiking is not recommended.
Ready to go hike in the snow? Check out our winter snow gear.